Lip Blushing in Nairobi, Kenya
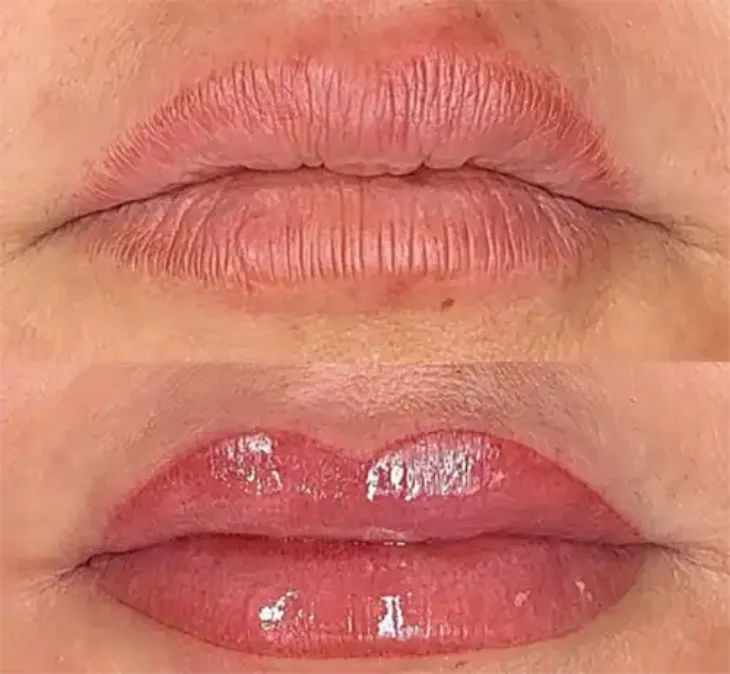
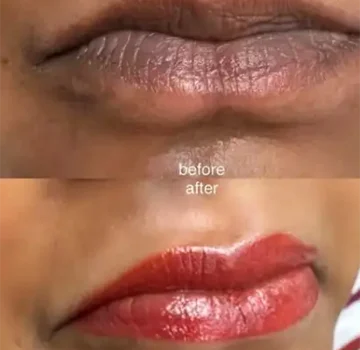
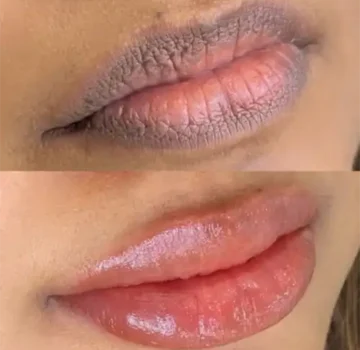
Lip Blushing is a semi-permanent cosmetic tattooing procedure that enhances the natural color and shape of the lips, giving them a more defined, fuller, and youthful appearance.
Lip Blushing
The purpose of lip blushing is to enhance the natural appearance of the lips by adding semi-permanent pigment for a more defined shape, even tone, and youthful color. Unlike traditional lipstick or liners, lip blushing delivers long-lasting, natural-looking results.
Key Purposes of Lip Blushing:
- Enhance Natural Lip Color:
– Adds a subtle tint that mimics a soft lip stain
– Restores color to pale or fading lips - Define Lip Shape and Border:
– Sharpens and evens out the vermillion border (where lip meets skin)
– Improves symmetry without surgery or fillers - Correct Pigmentation Issues:
– Neutralizes dark spots or uneven lip tones (common in melanin-rich skin tones)
– Ideal for those with scarring or fading due to age or trauma - Create the Illusion of Fuller Lips:
– A precise outline and soft shading make lips appear naturally plumper
– No need for injections - Reduce Daily Makeup Time:
– Eliminates the need to constantly reapply lipstick or liner
– Great for active lifestyles or people with makeup allergies - Boost Confidence: Many clients feel more confident and polished, even without makeup
Lip Blushing Technique: Step-by-Step Overview
Lip blushing is a semi-permanent makeup technique that uses a digital tattooing machine to implant pigment into the lips, enhancing their natural color and shape. Here’s a breakdown of the process:
- Consultation & Color Selection
– Our artist assesses your skin tone, lip shape, and personal preferences.
– A custom pigment color is mixed to suit your natural complexion or desired look (e.g., nude, pink, coral, mauve).
– Before/after expectations, healing, and contraindications are discussed. - Mapping & Shaping
– The lips are outlined using a pencil to define the shape.
– Corrections are made to balance asymmetry or uneven borders.
– You’ll approve the design before pigment is applied. - Numbing
– A topical numbing cream is applied to minimize discomfort.
– Secondary numbing is used throughout the session if needed. - Pigment Implantation (Tattooing)
– A PMU (permanent makeup) machine with a sterile, single-use needle is used.
– Our artist uses small, controlled motions to implant pigment into the top dermal layer.
– The technique involves soft shading, layering color gradually for a natural look.
– Multiple passes may be done to build depth and ensure even pigment saturation. - Blending & Final Touches
– Shading is blended toward the center for a smooth gradient or “tinted balm” effect.
– Our artist ensures the color is even and consistent with your desired result. - Aftercare Instructions
– You’ll receive a detailed healing guide.
– Healing typically involves light peeling and takes 5–10 days.
– Final results settle after 4–6 weeks. - Touch-Up Session (Optional but Recommended)
– Performed after 6–8 weeks to perfect the shape and color.
– Ensures pigment retention and long-lasting results.
How Many Sessions Are Needed for Lip Blushing?
Typically, 2 sessions are required to achieve the best and longest-lasting lip blushing results.
- Session 1 – Initial Procedure (2–3 hours)
– This is the main application where the pigment is deposited into the lips.
– Our artist shapes, shades, and colors the lips based on your preferences.
– Healing starts immediately after, and the color will lighten as the lips heal. - Session 2 – Touch-Up (6–8 weeks later, 1–2 hours)
– This session perfects the color, shape, and evenness.
– Areas that faded more than others or need deepening are retouched.
– It’s essential for long-term pigment retention. - Optional: Annual Refreshers (Every 12–24 months)
– To maintain vibrant color and sharp shape, a refresh session may be needed once the pigment naturally fades over time.
– Frequency depends on your skin type, lifestyle, and lip care routine.
Lip Blushing Pain & Healing Process
Does Lip Blushing Hurt?
Pain Level: Mild to Moderate (1–4 out of 10)
- Most clients describe the sensation as light scratching, tingling, or a vibrating feeling—not actual pain.
- A strong topical numbing cream is applied before and during the procedure to keep you comfortable.
- People with low pain tolerance may feel more discomfort, especially during the outline or touch-up phase.
Tip: If you’re prone to cold sores, ask our artist about antiviral medication before the procedure to avoid flare-ups.
Healing Stages (What to Expect)
Healing time: 5–10 days for surface healing, full results in 4–6 weeks.
- Day 1–2:
– Lips look bold, swollen, and bright (don’t worry—this fades).
– You may feel tightness, dryness, and mild tenderness. - Day 3–5:
– Peeling/flaking starts as the lips begin to shed old skin.
– Color may look patchy or faded—this is completely normal. - Day 6–10:
– Most flaking is done. Lips feel softer.
– Color appears 40–60% lighter than Day 1. - Week 4–6:
– Color resurfaces gradually and becomes more natural and even.
– A touch-up session is usually done during this phase.
Healing Tips:
- Apply healing ointment (as advised) to keep lips hydrated.
- No kissing, makeup, spicy food, or exfoliation for at least a week.
- Avoid sun exposure and swimming until fully healed.
- Do NOT pick or peel the flaking skin.




Lip Blushing Aftercare Guide
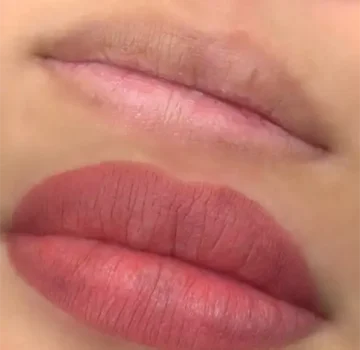
Proper aftercare is essential for best healing, long-lasting color, and avoiding infections. Follow these steps closely for smooth, beautiful results.
Days 1–10: Immediate Aftercare
- DO:
– Keep lips clean and moisturized
– Use the recommended healing balm (e.g., Aquaphor or artist-provided ointment) 2–3x a day or as needed.
– Blot gently: Dab excess lymph fluid (clear plasma) with a clean tissue the first few hours after the procedure.
– Sleep on your back: Avoid smudging the lips during healing. - AVOID:
– Touching or picking at peeling skin
– Kissing, spicy/salty food, and citrus
– Makeup or skincare products on the lips
– Hot drinks, alcohol, or smoking
– Swimming, saunas, and excessive sweating
What to Expect (Days – What Happens)
- 1–2 – Swollen, bold, and vibrant color
- 3–5 – Peeling begins — lips look patchy or faded
- 6–10 – Flaking ends, color looks light
- 14–30 – Color resurfaces and evens out
Bonus Tips
- Drink through a straw to avoid contact
- Use a lip balm with SPF after healing to prevent fading
- If prone to cold sores, take antiviral medication before & after the procedure
Touch-Up Appointment: Book your perfecting session 6–8 weeks later to refine the color and shape.
Cost of Lip Blushing in Nairobi, Kenya
The cost of lip blushing can vary depending on the artist’s experience, location, and what’s included in the package. Here’s a general breakdown:
Average Price Range (Estimates): KSh – KSh
What’s Usually Included:
- Consultation & color matching
- Initial lip blushing session (2–3 hours)
- Aftercare kit (balm, instructions)
- One touch-up session (usually 6–8 weeks later)
Annual refresh sessions (optional): KSh – KSh depending on fading.
Things That Can Affect Price:
- Artist’s reputation & certifications
- Location (high-end studio vs. independent tech)
- Type of pigments used (vegan/organic)
- Extras like numbing, pre/post-care kits
Get In Touch
For more information on the list above and any other special services,please call or come in for free consultation
Testimonials


Secondly, he's got impressive craftsmanship because the tattoo came out exactly as I imagined, and he also takes the time to check up on you during the healing phase. Couldn't recommend a better artist! Cheers man! I'll be back for the second one🔥


The service from Erick was amazing, before and after getting the tattoo, I'm Impressed with how my tattoo healed up smoothly, I followed the instructions and was using the tattoo balm that was offered, loved that the hygiene levels were very high, they've kept the place clean and ambience was nice👌.....Will definitely go back for more💯...


After he pierced my industrial piercing and seeing his amazing work, I feel even more excited about getting my tattoo with him in January. I’m really looking forward to it!


I am extremely happy with my new 'Safari' tattoo from Eric at Rebel Inks! The quality of the artwork is fantastic. Eric is a true professional and an amazing artist.
The preparation and design process was thorough and collaborative. He was very patient with my specific requests, including making sure all the elements, which hold personal meaning, were perfect.
The service was friendly and highly professional from start to finish. Despite the 8-hour session, Eric was a pleasant person to spend the time with.
The aftercare guidance and follow-up have been excellent and careful, which has made the healing process easy and better than expected.
I highly recommend Eric for anyone looking for a thoughtful, talented, and caring tattoo artist.




I recommend them 💯








I would definitely recommend if you’re thinking of getting a piercing!


The staff were super friendly, explained everything clearly, and made me feel so at ease. They answered all my nervous questions (and I had many questions),
They walked me through the whole process, gave detailed aftercare instructions, and even followed up afterward to check how I was healing 🫶
Clean, professional, and full of good vibes.
Would 100% recommend . Definitely making a second trip here.


This was the second tattoo I got and I wish I could have come to Eric for my first one! He gave me really great after-care directions for the tattoo as well as a little jar of his own Vaseline-type stuff to put over my tattoo while it was healing! He even put second skin over my tattoo so that I didn’t have to worry about it for the first few days. Now THAT’S good service. My first tattoo artist didn’t do none of that lol.
After the session Eric didn’t rush me and my friend out, he chatted with us and even when he found out I was an artist too— really encouraged me to keep creating and to find a community of artists to support me. I almost cried because I’ve had such a hard time with my own art the past couple of years, it meant so much to me to have a fellow very talented artist say that to me. 🤍🤍🤍
Eric you’re amazing, don’t ever stop creating and just know you’ve impacted lives all over the world!🫶🏻 thanks so much for everything!!


From the moment I walked in, Eric was professional, welcoming, and attentive. He made sure I was comfortable throughout, provided everything I needed, and explained every step of the process. The tattooing itself was unbelievably smooth - I genuinely felt no pain compared to my previous tattoos over the last 22 years.
Eric also gave me excellent aftercare guidance and products, and thanks to that, my tattoo healed beautifully. The attention to detail, precision, and shading are absolutely stunning. This is hands-down the best tattoo I've ever had, and I will be flying back to Nairobi for any future ink.
If you want incredible art, a professional experience, and a talented artist who truly cares about his clients, Rebel Ink is the place to go!




From start to finish, the service was exceptional. The piercer was professional, knowledgeable, and made me feel completely comfortable. The cleanliness of the place was above and beyond — everything was spotless and hygienic, which really put me at ease. Highly recommend for anyone considering a piercing!


Shout out to Eric😘




We ended up changing the jewelry three times to ensure I had the best fit and avoided any signs of rejection, and he always listened to my suggestions as a client, which I really appreciated. Now, three months in, my piercing is healing beautifully, with no sign of rejection. Highly recommend for anyone who values a piercer who cares about your comfort and healing journey!


What stood out the most was the aftercare Eric checked in with me even three weeks later to see how the tattoo was healing. That kind of follow-up shows how much he truly cares about his work and his clients.
I’m very satisfied and will definitely be coming back for my next piece. Highly recommend!


The piercing wasn't as painful as I had thought and the process was quick and satisfactory. I love it!!!
The piercing is healing well thanks to the aftercare instructions and follow-up. I would highly recommend Rebel Inks


Eric also did a belly button piercing for a friend, guiding her through the process, doing the piercing and then explaining the after care to her.
The shop is on the 3rd floor, with the entrance to the stairs near an alleyway on the left. The shop is perfect size, clean, and attractive looking. The mural is pretty dope.





Thank you for the amazing service! 🔥👅✨


I got piercibgs there and the process was really good. My biggest concern was hygiene but that wasn't an issue at all, they use new needles and they sanitize them.
The service itself was also welcoming.
I was informes of everything i needed to know beforehand.
10/10 would recommend!


Eric was so calm and patient with my almost 2 year old lady. It was such a clean and hygienic process. We will definitely be back for our second rounds of piercings and maybe even another tattoo!


They assess the area before any art and advise one accordingly. They also give one post clean up process and also do a check up after the body art projects. Overall, I loved my experience and I’m hooked. 👍


Will definitely come back next time I’m in town 🙂


He listened to what I actually wanted and made sure he could fit in the time before I flew back home.
The shop is clean & private and is easy enough to find.
Eric has even checked in a couple of times since to make sure all is good.
I would totally recommend Eric! I absolutely love my Elephants!




I had a very easy healing period and always follow up from Eric to check on my progress...I would highly recommend if you are a first timer because from my experience all went very well and attention to detail
Thank you for a good job and looking forward to send all my friends your way
And all the best with the new year 2025!


From the moment I walked in, the staff was super friendly and made me feel at ease. The studio had a clean, professional atmosphere, which immediately put me at ease. My piercer was incredibly skilled and explained every step of the process, ensuring I was comfortable the entire time. The piercing was quick and practically painless, and the aftercare instructions were clear and easy to follow. I can tell they really care about the health and safety of their clients.
Overall, a fantastic experience—I highly recommend Rebel Inks and Tattoos for anyone looking to get pierced or tattooed!




They do follow up after their services


Eric's Studio isn’t just a place to get a tattoo—it’s an experience. The combination of professionalism, artistic talent, and a welcoming environment makes it a standout destination for anyone considering a tattoo.
I highly recommend Eric’s Studio to both first-timers and seasoned tattoo enthusiasts. If you’re looking for a high-quality tattoo and an enjoyable experience, this is the place to go.


I would definitely recommend their services again and again
Thank you Rebel Ink


I highly recommend


My piercings are healing ❤️🩹 well
I would 💯 recommend
I will definitely come back for more .


Two, all the equipments he used for the piercings were new and/or sterilised.
Three, the parlour itself was very clean and was up to par with the hygiene standards.
Four, Eric provided effective aftercare instructions, making sure I knew exactly how to take care of my new piercings and he kept in touch and continues to do so, to check on the healing progress.
I highly highly highly recommend this place!!!


Would definitely recommend them to friends and go back for other piercings




Not only was the piercing process smooth, but he also provided thorough aftercare instructions, making sure I knew exactly how to take care of my new piercings. What really impressed me was that he keeps in touch to check on how the healing is progressing – a sign of true care for his clients.
The shop maintains a high standard of hygiene, and the atmosphere is welcoming and comfortable, which really added to the positive experience. I highly recommend this place to anyone looking for a professional and caring experience. I’ll definitely be coming back for any future piercings!


My appreciation for the excellent customer service I received. The follow-ups were prompt, and I truly appreciated the gentleness and professionalism throughout. Thank you!"
"Looking for professional eyebrow microshading removal? Look no further!"


The customer care is top tier 👌🏾👌🏾.
Wonderful place to get tattoos and piercings. 💯💯


Eric goes ahead to follow up on his clients progress and gives good advice each time I reach out to him.





I would recommend Reble tattoos anytime.
Good job bro we really appreciate.
Ohh and the price is very fair.


The environment was clean , procedure was sterile and the jewelry used are of the best quality.
He followed up with me during the healing process, he educated me on what I needed to do for my aftercare.
Eric is confident, skilled , experienced and the best piercer. Highly recommend Rebel inks.✨



Definitely recommend!




Great experience.
Eric definitely know what he is doing .
I got exactly what I wanted 2 tiny tats on the same finger .
He was kind and patient throughout the session.
Healing process has been good .
Aftercare services were given and regular checkups on the healing process were done.
I would 💯recommend.





Eric gave me the best reception as it was my first time there,and made me trust him all the way. I appreciate good services.
There services are also affordable not to forget 😊.


He was also invested in the aftercare and would ensure I follow the do's and don'ts in taking care of the tattoo and ensuring proper healing and maximum ink retention.
Would highly recommend Rebel Inks Tattoos.


Rebel Inks Tattoo offer the best,affordable and quality tattoo removal services.If you have unwanted ink,choose Rebel Inks Tattoo,they're the best of the best and the professionalism is a top notch.They ensure you're free from unwanted ink with their Laser Tattoo Removal Technology...
I did a Laser Tattoo Removal with them and i can attest they're the best....
Kudos Eric...






I highly recommend.


It was a generally good experience with good hygiene during the piercing process and has been a smooth healing process.... 10/10





tips. Highly recommend 👍🏽




100% recommendable.




I was particularly impressed with Eric's attention to hygiene. He thoroughly cleaned the room before I entered, sanitized all of the equipment he would be using, and changed gloves between each ear. This level of cleanliness gave me great confidence in his professionalism.
Eric's commitment to customer service did not end on the day of the piercing. He followed up with me regularly throughout the healing process to ensure that I was following the aftercare instructions and that my earlobes were healing properly.
I highly recommend Rebel Inks to anyone in Nairobi who is considering getting a piercing. Eric is a highly skilled and experienced piercer who takes great pride in his work.


So I Check all the boxes below and more:
Customer Care: ✔️
Professionalism : ✔️
Cleanliness ✔️
Price: ✔️
After care service ✔️
Thanks and good job, Eric




The place is neat and clean and the equipments he used were also fine standards. Really appreciate his following up with me on the healing 🤗


I WOULD HIGHLY RECOMMEND THEIR SERVICES to everyone. Actually what you see on their website is EXACTLY what you will get. Keep up the good work Rebel inks Tattoos.


The infection is now gone. I would definitely recommend!


Can recommend this place totally and would go back there anytime!
Thanks!


OUR LOCATION
Areas We Serve
NAIROBI
KIAMBU
KAJIADO
MACHAKOS
