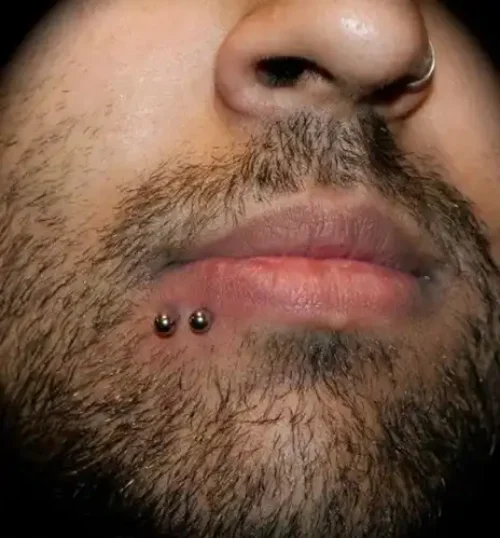
Spider Bite Piercing
Key Points About Spider Bites Piercing:
- Placement: The two piercings are done next to each other on the same side of the lower lip.
- Jewelry:
– Small labret studs or captive bead rings are commonly used.
– Start with longer jewelry to allow room for swelling. - Pain Level: Pain varies by individual, but on average, it rates 3–5 out of 10 since the lower lip is soft tissue.
- Healing Time:
– Takes 6 to 8 weeks to heal fully.
– Healing may extend if not cared for properly. - Aftercare Tips:
– Clean the piercings with saline solution twice a day.
– Avoid touching the piercings with dirty hands.
– Refrain from smoking, alcohol, and spicy foods during healing.
– Rinse your mouth with alcohol-free mouthwash after meals. - Risks:
– Swelling, irritation, infection, and possible tooth or gum erosion.
– Regular checkups with your piercer can ensure proper healing. - Style:
– Perfect for edgy, bold looks.
– You can swap out jewelry for hoops or unique studs after healing.
Spider Bites Piercing Procedure
The spider bites piercing procedure is a relatively quick and straightforward process when performed by a professional piercer. Here’s a step-by-step overview of what to expect:
- Consultation and Preparation
– Our piercer will discuss the placement, jewelry options, and aftercare instructions with you.
– You’ll be asked about any allergies (e.g., metals like nickel) or health concerns.
– Our piercer will clean the area around your lower lip with an antibacterial solution to ensure it’s sterile. - Marking the Placement
– Our piercer will mark two small dots on your lower lip using a sterile marker where the piercings will go.
– You’ll check the markings in the mirror to confirm the placement is to your liking. - The Piercing
– You’ll sit or lie down in a comfortable position.
– Ourpiercer will use a sterilized hollow needle to pierce the first marked spot.
→ A clamp may be used to hold the lip steady, though some piercers prefer to work freehand.
– The jewelry (usually a labret stud) is immediately inserted into the hole to keep it open.
– The process is repeated for the second piercing. - Pain Level: Pain is minimal to moderate since the lower lip is soft tissue. Many people describe it as a quick pinch.
- Aftercare and Final Steps
– Once both piercings are done, the piercer will clean the area again to remove any blood.
– You’ll receive aftercare instructions, which include:
→ Rinsing with saline solution or alcohol-free mouthwash.
→ Avoiding smoking, spicy foods, and alcohol during healing.
→ Keeping the area clean and not touching the jewelry with dirty hands.
– Swelling is normal for the first few days. The piercer may use slightly longer jewelry to allow room for swelling. - Healing Process
– Initial healing takes 6 to 8 weeks, though full healing may take longer.
– Regular cleaning is essential to prevent infection or complications.
What to Expect During the Procedure:
- Duration: About 10–15 minutes for marking, piercing, and inserting jewelry.
- Pain: A quick pinch followed by mild discomfort.
Considerations before getting a Spider Bites Piercing
Before getting a Spider Bites Piercing, there are several important considerations to keep in mind to ensure a safe experience and smooth healing process:
- Research a Professional Piercer
– Choose a professional and reputable piercer who follows strict hygiene protocols.
– Ensure they use sterilized, single-use needles and high-quality jewelry.
– Check reviews or portfolios of their work to assess their experience. - Pain Tolerance
– The pain level is generally 3–5 out of 10, but this can vary based on individual pain thresholds.
– Consider whether you are comfortable with the process, as you’ll be getting two piercings on the same day. - Oral Health and Lifestyle
– Healthy gums and teeth are essential. Poor oral hygiene can lead to complications like infections or gum recession.
– If you smoke, vape, or drink alcohol frequently, healing may be slower. Be prepared to minimize these habits. - Healing Time Commitment
– Healing takes 6–8 weeks for initial recovery, but full healing may take longer.
– During this time, you’ll need to:
→ Avoid spicy, acidic, or hard foods that can irritate the piercing.
→ Commit to regular cleaning with saline solution and alcohol-free mouthwash. - Jewelry Selection
– Start with high-quality jewelry like titanium, surgical steel, or gold to avoid allergic reactions.
– Our piercer will likely use longer labret studs initially to accommodate swelling.
– Be prepared to downsize the jewelry after swelling subsides to prevent gum or tooth damage. - Potential Risks and Complications
– Swelling and irritation are common in the first few days.
– Risk of infection if aftercare isn’t followed properly.
– Prolonged contact with jewelry may cause:
→ Gum recession
→ Tooth erosion (especially if you bite or play with the jewelry)
– Scarring or asymmetry can occur if the piercings are not done properly. - Facial Aesthetics and Lifestyle
– Consider how the piercing aligns with your personal style, work dress code, or social settings.
– If you engage in sports or activities that involve facial contact, piercings may pose a risk. - Financial Commitment
– Factor in the cost of the piercing, high-quality jewelry, and any aftercare products.
– Budget for jewelry changes after healing. - Allergies or Health Concerns
– Inform your piercer of any metal allergies or skin sensitivities.
– If you have conditions like diabetes or a weakened immune system, healing may take longer. Consult with your doctor first. - Aftercare Responsibility
– You’ll need to commit to consistent oral and piercing care:
→ Clean with saline solution twice daily.
→ Avoid touching or playing with the jewelry.
→ Rinse your mouth after meals with alcohol-free mouthwash.
Pain and Healing for a Spider Bites Piercing
Pain Level
The spider bites piercing involves two piercings on the same side of the lower lip, so pain will be slightly higher compared to a single lip piercing.
- Pain Rating: 3–5 out of 10
- Most people describe the sensation as a quick pinch or sharp pressure that subsides quickly.
- Pain tolerance varies by individual, but the lower lip is soft tissue, making it less painful than cartilage piercings.
Factors Influencing Pain:
- Individual pain threshold
- The skill and experience of the piercer
- Your stress or anxiety level during the procedure
Tip: Relax, breathe steadily, and trust your piercer. This can make the experience much smoother.
Healing Process
Spider bites piercings typically heal in two stages: initial healing and full healing.
- Initial Healing Time:
– 6 to 8 weeks for the swelling and tenderness to reduce significantly.
– During this period, the body forms a protective layer around the piercing. - Full Healing Time: Can take 3–6 months for the tissue to completely heal, depending on aftercare and lifestyle.
What to Expect During Healing
- Swelling:
– Swelling is normal for the first 3–5 days.
– Our piercer will use slightly longer jewelry to allow for this. - Discomfort: Tenderness, slight bruising, and redness around the piercing are normal initially.
- Discharge: A small amount of clear or whitish fluid (lymph) may form around the piercing. This is part of the healing process.
Signs of Healing vs. Infection
- Normal Healing Signs:
– Swelling decreases after a few days.
– Minor redness and clear discharge. - Infection Signs (seek medical advice):
– Persistent swelling, redness, or heat.
– Yellow or green discharge with a foul smell.
– Severe pain or fever.
Managing Pain and Swelling
- Use a cold compress or suck on ice chips to reduce swelling.
- Take over-the-counter painkillers like ibuprofen (if safe for you) to manage discomfort.
- Avoid sleeping on your face to prevent pressure on the piercings.
Spider Bites Piercing Aftercare Guide
Proper aftercare is essential to ensure a smooth healing process and to prevent infections or complications for your spider bites piercing. Here’s a step-by-step guide:
- Clean the Piercings Daily
– Use a sterile saline solution or a sea salt soak twice a day:
→ Mix 1/4 teaspoon of non-iodized sea salt in 8 oz of warm distilled water.
→ Soak a clean cotton ball or pad in the solution and gently clean around the piercings.
– Avoid using alcohol, hydrogen peroxide, or harsh antiseptics as they can irritate and delay healing. - Rinse Your Mouth After Eating and Drinking
– Use an alcohol-free mouthwash or saline rinse after every meal or drink to keep the inside of the piercings clean.
– Stay away from sugary or acidic drinks that can irritate the piercings. - Minimize Swelling
– Suck on ice chips or drink cold water to soothe the area and reduce swelling.
– Avoid sleeping on your face or putting pressure on the piercing.
– Take over-the-counter anti-inflammatory medication like ibuprofen if needed (consult a doctor first). - Avoid Touching or Playing with the Jewelry
– Do not twist, touch, or move the jewelry unnecessarily. This can introduce bacteria or cause trauma to the healing tissue.
– Always wash your hands thoroughly before cleaning the piercing. - Watch Your Diet
– Avoid foods and drinks that can irritate the piercings:
→ Spicy, salty, or acidic foods
→ Hot beverages like coffee or tea
→ Alcohol (including mouthwashes with alcohol)
– Stick to soft foods for the first few days to prevent discomfort. - Say No to Smoking and Kissing
– Smoking and vaping can introduce harmful bacteria and slow down healing. Try to avoid them as much as possible.
– Avoid kissing or oral contact, as this increases the risk of infection. - Keep the Outside of the Piercing Clean
– Gently clean the outer area of the piercing using saline solution and a clean, soft cloth or gauze.
– Pat dry with a clean paper towel (avoid regular towels, which can harbor bacteria). - Avoid Makeup and Skincare Products
– Do not apply lip gloss, lipstick, or other cosmetic products near the piercings during healing.
– Avoid skincare products or lotions that may get into the piercing holes. - Jewelry Care
– Our piercer will start with longer jewelry to accommodate swelling.
– After the initial healing phase, visit your piercer to downsize the jewelry to avoid gum or tooth damage.
– Only use high-quality materials like surgical steel, titanium, or gold to minimize allergic reactions. - Be Alert for Infection
– Signs of a normal healing process include minor redness, swelling, and clear discharge. However, seek medical attention if you notice:
→ Persistent pain, swelling, or heat around the area.
→ Yellow or green discharge with a foul odor.
→ Excessive bleeding or fever.
General Healing Time
- Initial Healing: 6–8 weeks
- Full Healing: Up to 3–6 months
Spider Bites Piercing Jewelry Guide
Choosing the right jewelry for your spider bites piercing is essential for comfort, healing, and style. Here’s a breakdown of the best jewelry options, materials, and considerations:
Types of Jewelry for Spider Bites Piercing
- Labret Studs (Ideal for Initial Healing):
– A straight bar with a flat back and a decorative top (ball, gemstone, or unique designs).
– Flat backs are comfortable and reduce irritation to gums and teeth. - Captive Bead Rings (CBRs):
– Circular rings with a small bead that snaps into place.
– Offers a bold, edgy aesthetic once healing is complete. - Seamless Rings or Hoops:
– Smooth, thin rings that create a sleek and minimal look.
– Best for healed piercings to avoid irritation during the healing process. - Circular Barbells:
– A horseshoe-shaped ring with two beads on each end.
– Great for versatility and style customization.
Jewelry Material Options
For safety and to avoid allergic reactions, opt for high-quality, hypoallergenic materials:
- Titanium (Recommended for Healing):
– Lightweight, hypoallergenic, and corrosion-resistant.
– Ideal for sensitive skin as it contains no nickel. - Surgical Stainless Steel:
– Durable, affordable, and commonly used.
– Avoid if you have nickel allergies, as it contains trace amounts. - 14k or 18k Solid Gold:
– A stylish, hypoallergenic option for healed piercings.
– Avoid plated or low-quality gold, as it can cause irritation. - Niobium:
– Soft, flexible, and hypoallergenic.
– A good alternative to titanium. - Bioplast or PTFE:
– Flexible, lightweight plastic that reduces irritation.
– Great for minimizing contact with gums or teeth.
Sizing Guide
- Gauge Size: Standard size is 16G (1.2mm thickness) for most lip piercings.
- Length:
– For initial healing, jewelry should be slightly longer (e.g., 8mm–10mm) to accommodate swelling.
– Once healed, you can downsize to 6mm–8mm to prevent gum and tooth damage.
Style Options for Jewelry Tops
- Classic Ball Ends: Minimalist and clean look.
- Gemstones: Add sparkle with cubic zirconia or opal tops.
- Flat Discs: Sleek and comfortable, especially for labret studs.
- Unique Shapes: Options like stars, hearts, spikes, or custom designs can showcase your personality.
Changing Jewelry
- Wait until the piercing is fully healed (6–8 weeks or longer) before changing jewelry.
- Visit your piercer for downsizing to prevent irritation or migration.
Jewelry Maintenance
- Clean jewelry regularly with saline solution or mild soap and water.
- Avoid removing jewelry for extended periods to prevent the holes from closing.
Popular Looks for Spider Bites Piercings
- Double Labret Studs for a subtle, sleek appearance.
- Hoops or CBRs for an edgy, bold style.
- Mix-and-Match Designs: Combine a stud and a hoop for a unique asymmetrical look.
Cost of a Spider Bites Piercing in Nairobi, Kenya
The cost of a spider bites piercing can vary depending on location, studio reputation, and jewelry choice. Here’s a detailed breakdown of what to expect:
Average Cost
- General Price Range: Ksh. 3,000 – Ksh. 5,000
– This price typically covers the procedure for both piercings (spider bites include two piercings).
– It may include basic starter jewelry (usually stainless steel or titanium).
Factors That Influence Cost
- Studio Reputation and Location:
– High-end, professional studios in cities or upscale areas charge more. Rebel Inks Tattoos, Tattoo Removal, and Body Piercings Parlour is located in the heart of the Central Business Disrict (CBD) in Nairobi, Kenya, and is easily accessible to both locals and foreigners in the country.
– A more experienced piercer may charge higher fees due to their expertise. At Rebel Inks Tattoos, Tattoo Removal, and Body Piercings Parlour we have experienced professionals who offer quality and premium services. - Jewelry Choice:
– Basic jewelry like surgical steel is included in many prices.
– Upgrading to titanium, gold, or custom jewelry can increase the cost by Ksh. 500 – Ksh. 2,000
– Jewelry with gemstones or unique designs may cost even more. - Piercer’s Experience: Highly experienced, licensed piercers charge more for their skills, but they also reduce the risk of complications.
- Aftercare Products:
– Saline solution or sea salt soaks are often recommended and may cost an additional Ksh. 500 – Ksh. 1,000
– Some studios provide aftercare kits as part of the total price.
Spider Bites Piercing Cost Breakdown Table
Component / Package | Estimated Cost (KSh) | Details / Notes |
Piercing procedure for both holes (Spider Bites) | 3,000 ‒ 5,000 | Basic procedure + starter jewelry (steel or titanium) |
Upgraded jewelry (per piece) | 500 ‒ 2,000 | Gold, decorative ends, gems, or hypoallergenic materials |
Aftercare kit / cleaning supplies | 500 ‒ 1,000 | Saline spray, cleaning solution, instructions |
Follow-up / check-up | 200 ‒ 500 | For downsizing jewelry after healing or checking placement |
Total – Budget/Standard Package | 3,500 – 6,000 | Procedure + basic jewelry + minimal aftercare |
Total – Premium Package | 6,000 – 8,500 | Includes upgraded jewelry, perhaps gem ends, decorative style, better aftercare |
Why You Shouldn’t Choose “Cheap” Piercing Services
Opting for a lower price may compromise:
- Hygiene Standards: Cheaper studios may cut corners on sterilization.
- Jewelry Quality: Poor-quality jewelry can cause infections or allergic reactions.
- Skill Level: Inexperienced piercers increase the risk of incorrect placement, scarring, or complications.
Invest in quality for safety and comfort!
Possible Side Effects of Spider Bites Piercing
While a spider bites piercing is generally safe when done professionally, there are potential side effects and risks to consider during and after the healing process. Here’s what you need to know:
- Swelling and Bruising
– What Happens: The lower lip area often swells for the first few days due to the trauma of the piercing.
– How to Manage:
→ Use cold compresses or suck on ice chips.
→ Avoid spicy or salty foods that can aggravate swelling. - Infection
– Signs of Infection:
→ Persistent redness, swelling, or heat around the piercings.
→ Yellow or green discharge with a foul smell.
→ Increased pain or fever.
– How to Prevent It:
→ Clean the piercings with saline solution twice daily.
→ Rinse your mouth after meals with alcohol-free mouthwash.
→ Avoid touching the jewelry with unwashed hands. - Gum Recession
– What Happens: Jewelry (especially if too large or improperly sized) can rub against the gums, causing them to recede over time.
– Prevention:
→ Opt for smaller, well-fitted jewelry after the initial healing period.
→ Avoid playing with or biting down on the jewelry. - Tooth Damage
– What Happens: Jewelry can chip or erode teeth if it hits them frequently during talking or chewing.
– How to Prevent It:
→ Switch to flat-back labret studs instead of hoops during healing.
→ Be mindful of your movements to avoid biting down on the jewelry. - Scarring or Keloids
– What Happens: Improper healing, trauma, or irritation can lead to hypertrophic scarring or keloids (raised scar tissue).
– How to Minimize It:
→ Avoid touching or irritating the piercings.
→ Follow aftercare instructions consistently.
→ Consult a piercer if a bump forms—they can recommend treatments like saline soaks. - Jewelry Rejection or Migration
– What Happens: The body may push the jewelry out (rejection) or the piercing may shift position (migration).
– Causes: Poor jewelry quality, improper placement, or trauma.
– Prevention:
→ Use hypoallergenic jewelry (e.g., titanium or gold).
→ Avoid physical trauma or tugging on the jewelry. - Allergic Reactions
– What Happens: Sensitivity to jewelry materials (like nickel) can cause itching, redness, or rash-like symptoms.
– Prevention:
→ Start with high-quality materials like titanium, niobium, or solid gold.
→ Avoid cheap or plated jewelry. - Excessive Saliva Production
– What Happens: Your body may react to the new jewelry by producing more saliva. This usually resolves after a few days. - Difficulty Eating or Speaking
– What Happens: Swelling and the presence of jewelry can make it hard to eat, drink, or pronounce certain words initially.
– How to Manage:
→ Stick to soft foods and drink plenty of water during the first few days.
→ Practice speaking slowly as you adjust to the jewelry. - Piercing Bumps
– What Happens: Small red or clear bumps may develop due to irritation or improper aftercare.
– How to Manage:
→ Use saline soaks to reduce irritation.
→ Avoid touching or picking at the bump.
How to Avoid Most Side Effects
- Choose a Professional Piercer: Ensure they use sterile equipment, and have experience with lip piercings.
- Follow Aftercare Guidelines: Clean twice daily, avoid irritants, and don’t play with the jewelry.
- Use High-Quality Jewelry: Start with titanium, surgical steel, or gold to minimize reactions.
- Avoid Oral Contact: Don’t kiss, smoke, or consume alcohol during the healing process.
Related Piercing
Get In Touch
For more information on the list above and any other special services,please call or come in for free consultation
Testimonials
OUR LOCATION
Areas We Serve
NAIROBI
KIAMBU
KAJIADO
MACHAKOS

